

Wireguard
Wireguard는 IPv4와 IPv6를 지원하는 오픈소스 Virtual Private Network (VPN)입니다. WireGuard는 서로가 공유하는 개인키와 공개키를 기반으로 하는 암호화를 사용하여 암호화된 터널을 구축합니다.
| 특징 | WireGuard | OpenVPN | IPsec |
| 성능 | 가장 빠르고 효율적 | 상대적으로 빠름 | 구현방식 따라 차이가 있음 |
| 보안 | 현대적인 암호화 알고리즘 | 오랜 시간 검증된 보안 | 오랜 역사를 가진 프로토콜 |
| 커뮤니티 | 빠르게 성장하는 커뮤니티 | 오랜 역사로 많은 문서 존재 | |
| 특징 | UDP 기반, Noise Protocol | 다양한 옵션, TCP/UDP | 다양한 모드와 암호화 방식 |
| 주요 암호화 알고리즘 | ChaCha20, Poly1305 | AES-256, Blowfish | AES-256, 3DES, RSA |
Wireguard 구축 (Debian 12 기준)
1. Wireguard 설치 후 KeyPair 생성
1.1 패키지 설치
$ sudo apt update
$ sudo apt install wireguard
1.2 PrivateKey 생성
# PrivateKey 생성 후 저장
$ wg genkey | sudo tee /etc/wireguard/private.key

# 생성한 키의 권한을 root 제외하고는 없앰
$ sudo chmod go= /etc/wireguard/private.key

# 앞서 생성한 privatekey를 이용해 pubkey 생성
$ sudo cat /etc/wireguard/private.key | wg pubkey | sudo tee /etc/wireguard/public.key
2. WireGuard Server 설정
2.1. Configuration 생성
# /etc/wireguard/wg0.conf
1 [Interface]
2 PrivateKey = 여기에 아까 생성한 PrivateKey 입력
3 Address = 10.8.0.1/24, fd29:e11f:a198::1/64
4 ListenPort = 51820
5 SaveConfig = true
2.2. Server의 네트워크 설정 변경
이 부분은 WireGuard를 사용하여 피어를 WireGuard 서버에 연결하여 서버의 서비스에만 액세스하는 경우에는 하지 않으셔도 됩니다. WireGuard Peer의 인터넷 트래픽을 WireGuard Server를 통해 라우팅하려면 아래의 설정을 하시면 됩니다.
# /etc/sysctl.conf
 28 net.ipv4.ip_forward=1
	~
    ~
    ~
 33 net.ipv6.conf.all.forwarding=1
# 변경사항 적용
$ sudo sysctl -p
net.ipv4.ip_forward = 1
net.ipv6.conf.all.forwarding = 1
2.3 Firewall
위의 2.2와 동일하게 VPN 트래픽을 Wireguard Server를 통해 라우팅 하는 경우에만 하시면 됩니다.
# /etc/wireguard/wg.conf
  6 PostUp = ufw route allow in on wg0 out on eth0
  7 PostUp = iptables -t nat -I POSTROUTING -o eth0 -j MASQUERADE
  8 PostUp = ip6tables -t nat -I POSTROUTING -o eth0 -j MASQUERADE
  9 PreDown = ufw route delete allow in on wg0 out on eth0
 10 PreDown = iptables -t nat -D POSTROUTING -o eth0 -j MASQUERADE
 11 PreDown = ip6tables -t nat -D POSTROUTING -o eth0 -j MASQUERADE
# 방화벽 포트 허용
$ ufw allow 51820/udp
3. WireGuard 서버 시작
$ sudo systemctl enable wg-quick@wg0.service --now
$ sudo systemctl status wg-quick@wg0.service
WireGuard Peer Configuration (Windows)
윈도우 환경에서 위에서 구축한 WireGuard에 접속하기 위한 방법입니다. 먼저 WireGuard 홈페이지에서 Windows 클라이언트를 받습니다. 다운로드 받은 파일을 설치하고 WireGuard를 실행하게 되면 아래와 같은 화면이 나옵니다. 그리고 새로운 연결을 추가하려면 아래 사진과 같이 Add empty tunnel을 선택합니다.

Add empty tunnel을 선택하게 되면 아래와 같은 화면이 나오게 되는데, Windows WireGuard 클라이언트에서는 연결에 사용할 Public Key와 Private Key를 알아서 만들어 줍니다.
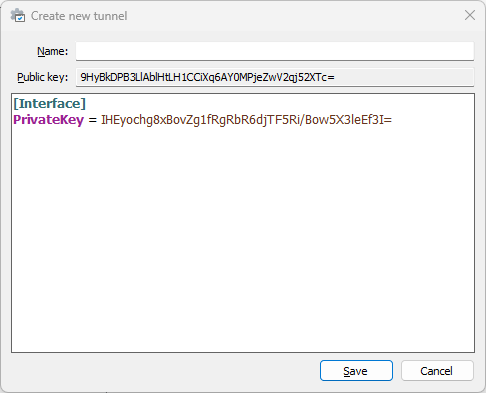
이제 내가 구축한 WireGuard에 연결하기 위해서 몇 가지 정보를 추가하면 됩니다.
[Interface]
PrivateKey = ~~~~~~~~~~~~~~~~~~~~~~~~~~~~~~~~~~~~~~~~
# 내가(클라이언트가) 사용할 주소
Address = 10.8.0.2/24, fd29:e11f:a198::2/64

[Peer]
# 연결할 원격지 Peer의 PublicKey
PublicKey = ~~~~~~~~~~~~~~~~~~~~~~~~~~~~~~~~~~~~~~~~
# VPN에 연결했을 때 어떤 대역을 VPN으로 보낼껀지 지정
# 모든 트래픽을 VPN으로 보내고 싶을 경우 0.0.0.0/0을 사용
AllowedIPs = 10.8.0.0/24, fd29:e11f:a198::/64, 192.168.0.0/24
# VPN 서버 주소
Endpoint = 1.2.3.4:51820
마지막으로, 클라이언트에서 연결 버튼을 누르기 전에 클라이언트의 PublicKey를 서버에 등록해주어야 합니다.
$ sudo wg set wg0 peer [클라이언트 PublicKey] allowed-ips 10.8.0.2
서버에서 peer를 등록했다면 아래의 명령어로 등록한 peer를 확인할 수 있습니다.
$ wg
이제 WireGuard 클라이언트에서 Activate 버튼으로 연결 하시면 됩니다. 연결이 성공됬다면 클라이언트 명령어에서 아래의 명령어를 통해 내가 의도한대로 됬는지 확인해 보세요. 위의 설정에서 저는 10.8.0.0/24 대역과 192.168.0.0/24 대역이 WireGuard로 통하도록 설정하였습니다. 그리고 터미널에서 명령어를 통해 확인해 봤을 때 의도한 설정대로 된것을 확인 할 수 있습니다.
PS C:\Users\sysoper> route print -4
		~
        ~
        ~

IPv4 Route Table
===========================================================================
Active Routes:
Network Destination        Netmask          Gateway       Interface  Metric
        ~
         10.8.0.0    255.255.255.0         On-link          10.8.0.2      5
         10.8.0.2  255.255.255.255         On-link          10.8.0.2    261
       10.8.0.255  255.255.255.255         On-link          10.8.0.2    261
        127.0.0.0        255.0.0.0         On-link         127.0.0.1    331
        127.0.0.1  255.255.255.255         On-link         127.0.0.1    331
  127.255.255.255  255.255.255.255         On-link         127.0.0.1    331
      192.168.0.0    255.255.255.0         On-link          10.8.0.2      5
    192.168.0.255  255.255.255.255         On-link          10.8.0.2    261
		~
        ~
        ~
===========================================================================
Persistent Routes:
  None
참고
WireGuard: fast, modern, secure VPN tunnel
WireGuard® is an extremely simple yet fast and modern VPN that utilizes state-of-the-art cryptography. It aims to be faster, simpler, leaner, and more useful than IPsec, while avoiding the massive headache. It intends to be considerably more performant th
www.wireguard.com
https://www.digitalocean.com/community/tutorials/how-to-set-up-wireguard-on-debian-11
How To Set Up WireGuard on Debian 11 | DigitalOcean
Working on improving health and education, reducing inequality, and spurring economic growth? We'd like to help.
www.digitalocean.com
https://serversideup.net/how-to-configure-a-wireguard-windows-10-vpn-client/
How to configure a WireGuard Windows 10 VPN client - Server Side Up
Learn how to set up Wireguard on a Windows 10 client. Route all of your traffic through your WIreguard VPN server.
serversideup.net